
Sync effects to music
Set the tempo, schedule layers on the beat grid, and drive effect motion from the beat clock so a show stays locked to the music.
Beat-synced lighting has two halves: a tempo the show runs on, and effects that read that tempo to move. The Beat Matcher sets and tracks the tempo. The beat grid on each timeline layer schedules when a layer plays, and the Time node lets an effect read the beat clock to drive its own motion. Because the whole timeline is measured in beats, a show set up this way stays locked to the music when the tempo changes. See Beat time for the model.
Set the tempo
Open the Beat Matcher panel. There are three ways to set the beat clock.
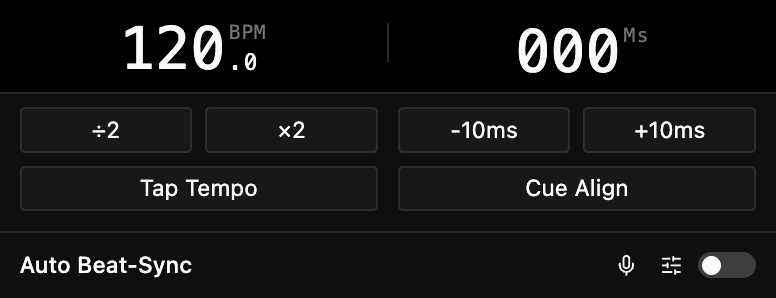
Type a BPM directly into the number field when you know the track's tempo or the music has none to detect. Use Tap to tap along four or more times and let Spectralite average your taps into a BPM. If the reading settles on twice or half the real tempo, the ×2 and ÷2 buttons correct the octave in one tap.
Let the detector follow the music
For live audio, turn on Auto Beat-Sync with the Auto button next to Tap. Spectralite listens to the incoming audio, finds the tempo, and trims the clock many times a second so the show tracks a band that drifts or a set that eases between tracks. The status under the BPM readout reads No signal until beats reach the detector, Listening while it settles, and turns orange with Locked once it is holding tempo and phase.
Pick the audio input from the microphone button in the panel's toolbar, or from Edit > Inputs > Audio. Prefer a direct feed from the mixer over a room microphone. While sync is running it drives the tempo, so the BPM readout and Tap step aside; ×2 and ÷2 stay live so you can fix an octave without dropping the lock.
The detector locks tempo and beat phase but does not decide which beat is the bar's "one". Press Cue on a heard downbeat to set the bar and, while synced, to calibrate for microphone and output delay in the same motion. Full setup, the confidence readout, and latency compensation live in the Beat Matcher reference.
Schedule a layer on the beat grid
The simplest beat-sync needs no nodes at all. In the Timeline, each layer row carries a beat grid: one bar split into sixteen slots, four per beat, where the effect plays wherever a slot is on. This schedule lives on the timeline row itself.
Click slots to build a pattern, or drag across a range. Switch a layer on for the first and third beats and clear the rest, and it hits on the two and four count against every other layer. Fill and Clear set all slots at once. Because the grid is measured in slots, the pattern keeps its place in the music whatever the tempo. The grid model is covered in Beat time.
Start from a bundled beat effect
Several of the effects that ship with Spectralite already read the beat clock, so you can get beat-locked motion without opening the Node Editor. Chase On Beat, Sparkle On Beat, and Colour Advance On Beat step on each beat; searching the browser for beat finds those three. Exponential Decay Flash, Asymmetric Pulse, Jump And Fall, Radial Shell, Helix Sweep, and Random Shape Burst are also beat-driven, but their names do not say so, so scroll to them instead.
Most come in two forms. The (Loop) form runs continuously against the beat grid, so it appears when you add a timeline layer. The (Bump) form fires once when you trigger it, so it appears only in the browser you open from the Bumps panel.
Any of them is a starting point. Select one in the Node Editor and click Duplicate, and you have your own editable graph that is already wired to the beat.
Drive an effect from the beat clock
To drive motion from the beat, and not only switching on and off, read the clock inside the effect. In the Node Editor, add a Time node. It has no inputs; its outputs are the beat clock in several forms:
- Beat Progress ramps
0to1once every beat. - Bar Progress ramps
0to1once every bar of four beats. - Cumulative Progress counts total beats as a continuous value that never resets, for animation that should not loop.
- Beat Index and Cumulative Beat Index count whole beats, within the bar and overall.
- Seconds counts time since start, and Active Seconds counts time since the layer turned on. Both step outside the beat clock, so use them when a motion should keep its real-world speed whatever the tempo. Timestamp and Active Time are the same two values in milliseconds.
For a flash that fires on each beat and decays, take Beat Progress, subtract it from 1 with a Subtract node so the value starts high and falls, and feed the result into your effect's brightness before the Output node. The light snaps up on the beat and fades until the next one.
For a color that walks the wheel once per bar, feed Bar Progress into the hue input of an HSL to RGB node, wire its color through Combine Color into Output, and the effect cycles through the spectrum each bar. See Connecting nodes for how ports link, and the nodes reference for every node by category.
Shape per-layer timing
Two controls in Layer Settings change how a layer moves through time while it plays. Speed scales the layer's playback rate against the beat: 2 runs its effect twice as fast, 0.5 half as fast, without touching the master BPM. Beat offset shifts the layer's phase by a number of beats, so a small offset between two otherwise identical layers makes them chase each other.
These reshape motion but not the schedule. When a layer plays still comes from its beat grid; these only change how its effect animates within that window.
Next steps
- Build a light show stacks beat-synced layers into a full looping show.
- Beat time is the model behind the beat clock and the grid.
- The Beat Matcher reference covers Auto Beat-Sync, latency, and correction settings.
- Audio input covers choosing and testing the signal the detector listens to.